Saturday, June 23, 2012

Pond Boats


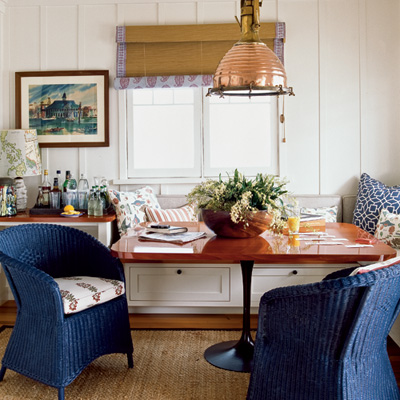
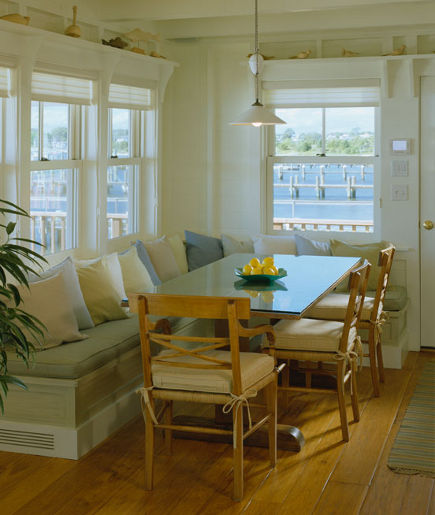
As long as people have been interested in “big” boats, they’ve been interested in models that depict them. Pond Boats or Pond Yachts as some call them have become extremely popular in home decorating. They have become a decorating accent in coastal and nautical décor. They ( the rare pond & model yachts built before World War I ) are a highly popular item with antique dealers and auction houses.


But do not despair, the market now produces authentic looking, top quality replications that are affordable. Many people want them for decorating purposes rather than for a collection, so they’re appeased with good reproductions at less expensive prices.

Recently I had the opportunity to visit a very well known Marine Antique shop in Newport Beach. What a treat to see authentic, pre World War I pond boats (typically used as toys) and at a steal. The price tag…..a mere $6,000. (and that was one of the cheap ones!)

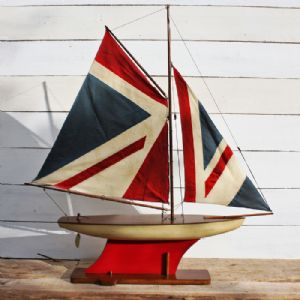
 As for me I am looking to buy mine for a mere $150 and use it for decorating not racing, and Queen Elizabeth did not have to play with it as a child so I can spend my savings somewhere else!

Thanks for taking a peek ~
Sharon :0)

Friday, June 22, 2012

Coastal Kitchen Ideas

I have been looking for a small rectangular kitchen table ever since I found this fabulous one in Coastal Living. I have a small nook that needs a small table and I love mixing textures as they did here. Metal base, wood top and rattan chairs.

What's not to love?

Well if you continue to look online for ideas you continue to love everything you see.
Built-in seating. What a great idea if you have the room........if not, how about a small bench?


Than I found this table that I absolutely fell in love with, but have yet to find similiar. Looks like a picnic table but painted. I love the crossed-legs. Where can I find this table? If you have a lead...let me know!


Thanks for taking a peek ~
Sharon :0)


Friday, June 15, 2012

Where's Sharon ?

I am still here! We have had family staying with us and everyday has been a shopping day here in So Cal! So many store's SO little time. I will be back to blogging on Monday so get ready for more places to go, DIY projects and all things Southern California!

Thanks for taking a peek ~
Sharon :0)

Friday, June 8, 2012

FUN FACTS FRIDAY - Think you know everything about California? Think again!


~*~ FUN & INTERESTING FACTS ~*~


Knott’s Berry Farm in Buena Park is the birthplace of the boysenberry.

Encinitas is the largest poinsettia grower in the world.

California has more theme parks and amusement parks than any other state — yes, even more than an Orlando vacation can offer.

The Star of India, located in San Diego, is the oldest active tall ship in the world.

Beverly Hills is the only city to boast: no hospital, no cemetery, no billboards, and no telephone or power wires.

Hollywood is home of the world’s largest outdoor amphitheater, the Hollywood Bowl.

California is home to more drive-in movie theater screens than any other state with 123 screens at 60 sites.

The 3 million square-foot California Mart in Los Angeles is the largest apparel wholesale market in the world.

Santa Monica boasts the longest stretch of beach on the Pacific Coast (3 miles).

California is home to more professional sports teams than any other state.

The world famous Rose Bowl in Pasadena is the nation’s oldest stadium.


Thanks for taking a peek ~
Sharon :0)


Monday, June 4, 2012

DIY OUTDOOR PROJECT REVEALED: OUTDOOR DAYBED LOUNGER

Here it is! Our little patio off the Master bedroom was so ho-hum. Now it's a great place for a siesta or to read a book or just to relax and let the day sail away~ ~ ~ ~ ~ ~ ~

Thanks for taking a peek ~
Sharon :0)
Our Outdoor Lounge area is finally done! I made the cushion out of 5" thick foam and made the cover out of Sunbrella. The pillows are an assortment of  Outdoor fabrics from Trina Turk, Duralee and Waverly.

We absolutely love it!

It all started with the stripes~

I added 3 hanging lanterns with candles for night time glow~

On the outside of the fence we have Pink Jasmine growing and it is peeking thru. I can't wait for it to bloom and fill the air with it's sweet aroma!


My Compass Rose Outdoor Rug from Lowes's

Night time glow~

Candle Lit Lounger!

:-)

Sunday, June 3, 2012

DIY Outdoor Project: Phase 2 - Making the Outdoor Daybed

I received a comment from a very nice reader yesterday about the first phase of this outdoor project, painting stripes on a fence. She loved the colors of the stripes on the white fence and told me I must have a ton of patience. No patience, Pat. It was all about using the product FROGTAPE. It worked very well for the surface I was putting it on and I highly recommend it.

Today is Phase 2: Making the Outdoor Daybed!

Oh yes! What is an outdoor room without some place to lounge? My husband and I got the idea when he was eyeing a Balinese Bamboo Outdoor Bed in a local store. The price, $1500. I said we can make that! And that is what we did. Of course we had limited room and it would not be made out of bamboo but it would be the best outdoor longing place we would have. And it definitely would be less than $1500.


The frame was easy. We first measured the size of our enclosed patio (which was 8'x10') to determine how large our daybed could be. We also have a sliding patio door and did not want the bed to extend into or obstruct the entrance . We decided that 43" deep and  the standard length of a sheet of plywood 8' would be fine.

We used:
4- 2x4x8' douglas fir studs
1 - sheet of 3/4" AC Plywood (this is good on one side)
1 - 4x4x8' douglas fir posts
Box of 2-1/2" exterior deck screws
1- piece of exterior siding
1 - tube of exterior caulking to seal seams
Exterior Paint of your choice

We than made our frame as shown above using the 2x4 studs and cutting them to our size. The 4x4 posts were used as legs, securing them into the corners with the deck screws for strength as well as height. Remember, a center piece of wood is necessary for support because of the size and weight that will be on this daybed. 

Finishing sides: We used an 8" x 10' single piece of outdoor siding for the edges. We ripped our's down to 6" wide since we wanted the legs to show. We also attached the siding with exterior deck screws to the front and one side that would be showing. We cut holes with a hole-saw into the top of the plywood so that it could be removed easily. We also notched out our top to fit around our fence posts. This is not necessary if you are placing your's against a wall or flat surface,
All painted and done! Well Not yet....come back tomorrow to see the
BIG REVEAL !
Thanks for taking a peek ~
Sharon :0)


Saturday, June 2, 2012

DIY Outdoor Project: Phase 1 - Painting the Fence with Stripes

As I mentioned yesterday, today is the day I would be unveiling a new Project my husband and I have just completed. Well after taking a look at all the material I would need to post, I decided it would be easier to break it down in 3 posts. The first Phase to be done was painting the fence. This is an outdoor space off our Master bedroom which is enclosed by a fence with a gate. It measures approx. 8'x10'. I wanted to be a bit creative with the fence so this is what I did:

Step 1. Paint the fence!
I chose White. Boring? Oh but wait! I added stripes!


before

Painted all White.

My line's needed to be drawn with a level to keep the stripe well, level! I than applied FROGTAPE (Painter's tape to be used when painting stripes, available at most hardware stores)

Continuing......I decided on the widths of my 2- stripes, made a new line for each in pencil (using my level)  and applied the FROGTAPE. (pressing firmly on all edges)

Here was the fun part. Adding Paint! I chose Marine Blue and Aqua.


I painted both stripes in each color (3x).

After.
 I gently removed the FROGTAPE.

I decided not to paint the gate. Believe it or not the FROGTAPE worked very well on a rough redwood fence. The line came out fairly sharp and the bleed thru was minimal. A little touch up was necessary. Come back tomorrow........This is just the beginning of the project!

Thanks for taking a peek ~
Sharon :0)

Friday, June 1, 2012

New Project FINALLY done!

I have not blogged since Monday, and I am so sorry to all my readers. My husband and I just finished our most recent project for our Beach House Remodel. It has taken us about 6 weeks since we only worked on it in our free time which were evenings and a couple hours on weekends. This project was a fun splurge project. We did not need it but we wanted it. I will give you a hint........ It has alot of color.
Can't figure it out? Okay, one more hint.... it will make you feel like your in...........YOU WILL JUST HAVE TO COME BACK TOMORROW FOR THE UNVEILING~

Thanks for taking a peek ~
Sharon :0)
Related Posts Plugin for WordPress, Blogger...